.svg)
Unlocking the Brain Benefits of Flow State in Early Music Education

Have you ever felt frustrated or bored while learning to play an instrument? This usually happens because students don’t always feel like they’re in flow state when practicing and learning - that mental zone where time seems to vanish and you become utterly absorbed in the activity. Learning to play an instrument isn’t just about mindless practice; it’s a complete brain workout! Sometimes, the mental gymnastics required to master an instrument can be challenging, pushing students to their limits.
Today, let’s delve into the fascinating world of flow state. We’ll discover how it’s reshaping the way students approach learning an instrument, and why it’s vital for nurturing young musicians who often find the journey too difficult or anxiety-ridden.

Flow State: A Brain Booster for Young Musicians
Mihaly Csikszentmihalyi’s groundbreaking work in his book Flow: The Psychology of Optimal Experience uncovered the concept of flow state. While it’s often associated with professional musicians and athletes, it can be a game-changer for budding musicians too.
Getting into flow state during music education is like unlocking a secret door to peak performance and enhanced learning. It is a state of complete concentration, where the outside world fades away and the music becomes the sole focus. It’s an optimal mental state where creativity and skill meld seamlessly, leading to a truly immersive musical experience. Flow typically occurs when the challenge of a task matches a student’s skill level. When the challenge is too low, a student might feel bored, and when it’s too high, they may become anxious.
In the world of music, entering flow state often involves selecting pieces of music that are just challenging enough to stretch a student’s ability, but not so difficult that they become frustrated. This is a lot harder than you might think, given the many variables of musical complexity within a single piece of music.
Bridging the Dropout Gap in Early Music Education
Traditional early music education isn’t all sunshine and harmonies. In fact, dropout rates among young music students are alarmingly high (~50% before they reach the age of 17). The typical grind of discipline and hard work can turn the sweet symphony of learning into a sour note.
So, how do we keep students engaged and passionate about music? The answer lies in integrating flow state into the early stages of learning an instrument. Positive feedback is also crucial. When students feel tangible progress in their education, they’re more likely to enter flow state. And when they receive praise for their efforts (not their achievements), they’re more likely to create positive feedback loops of internal motivation. This combination makes learning something new deeply engaging and gratifying.
The Art of Sight Reading: A Gateway to Flow State
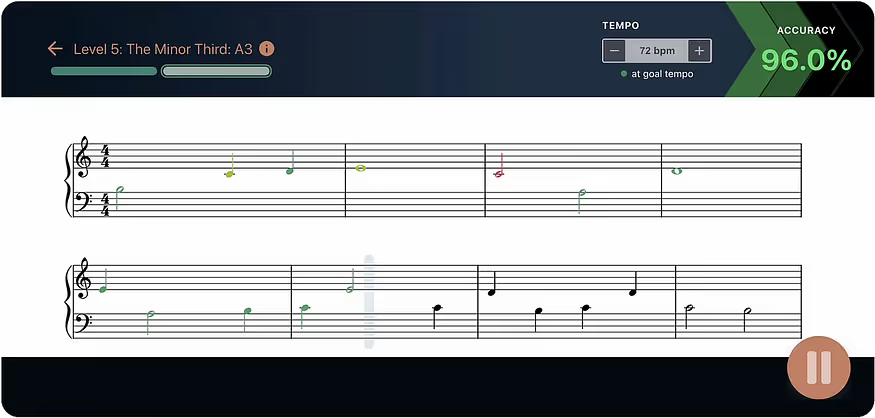
One of the most effective ways of reaching flow state while learning an instrument is through sight reading. Sight reading is the act of reading and playing music at first sight. Sight reading pushes students to train their reading and playing skills without relying on muscle memorization, which often becomes a crutch when practicing a single song repeatedly. If the challenge is in the “Goldilocks zone” of their skill level (not too hard, not too easy), then flow state is engaged.
Sight reading, if personalized to a student’s skill level, allows them to drop into flow, immersing them in the process of learning.

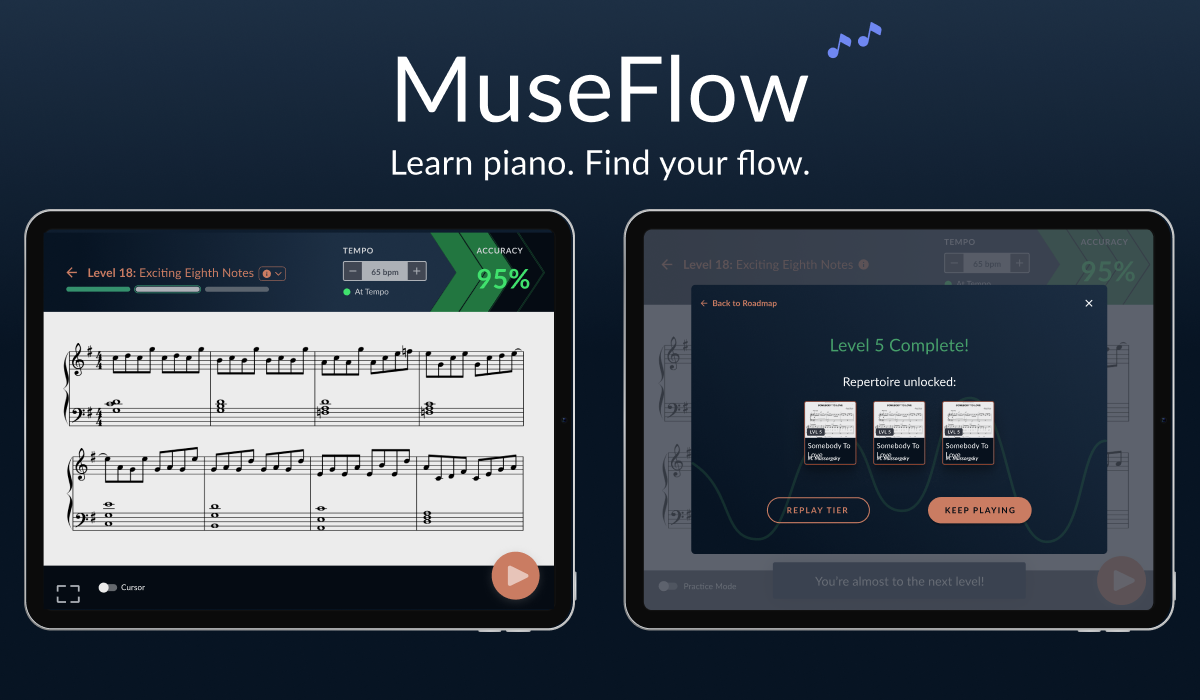
MuseFlow: Your Gateway to Flow State Learning
Enter MuseFlow, a web app set to transform how students learn piano, especially in the early stages. Instead of assigning one piece of music which exercises many skills all at once - thus making it hard to isolate practice on a specific technique - MuseFlow guides students through new rhythms and notes in isolation first, then embeds that new skill into the rest of their musical knowledge later on, all while immersing them in a constant stream of new music!!
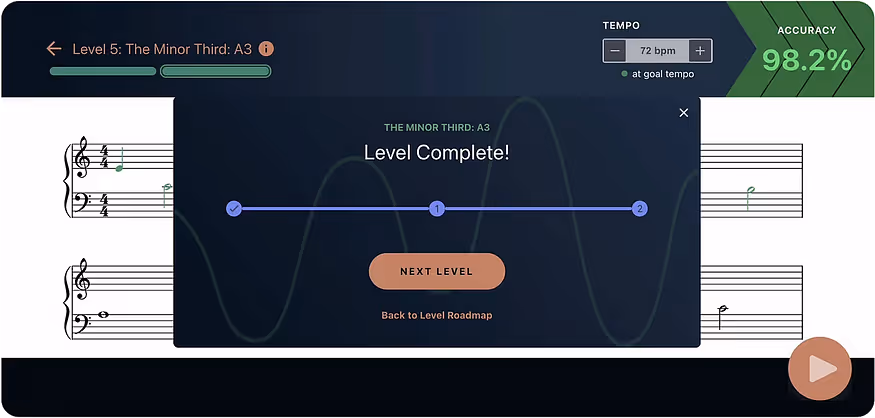
In the first level.. students learn how music is written, basic rhythms, their first note, and how that one note is played in both hands. Then, they simply start playing. The metronome sets the pace, a guiding cursor shows the next note, and they play each note on the spot while sight reading.
Rather than playing a passage of music, stopping, then repeating that same piece of music over and over again until it’s perfect, MuseFlow pushes students to keep playing no matter what. Getting stuck on previous mistakes is one of the most common ways for students to get knocked out of flow state and lose motivation. In MuseFlow, new music will continue to appear and help them hone their skills in ever-changing contexts, instead of stopping the flow to go back and repeat music they’ve already played.
This is the heart of flow state - that groove that students find themselves in, where time seems to fade away and the joy of learning takes center stage. It becomes just about passing each level, mastering each small new concept, one by one. They start to recognize those aha moments: “Oh my gosh, I’m getting it! I’m really getting it!” When they eventually pass the level, they experience a rush of dopamine and feel a sense of achievement that propels them forward on their musical journey.
Why Flow State Learning Matters
Csikszentmihalyi’s research reveals that being in a state of flow can turbocharge the learning process. It’s not only about making learning more enjoyable — it also boosts information retention. By weaving flow state into MuseFlow, we’re tackling the dropout crisis head-on. When students are deeply engaged in the process of learning an instrument, it boosts their motivation, achievement, and enjoyment of learning.
Curious about what MuseFlow has to offer? Visit www.museflow.ai to find out more. If you have a MIDI keyboard and a computer, try out the beta version at www.beta.museflow.ai. We can’t wait to hear what you think and set out on this musical journey with you!


.jpg)